
How To Share The Folder
Sharing Folder In Microsoft Windows
Note--For sharing a folder in Microsoft Windows you must be logged on a system via Administrator Account firstly.
1-Create a folder which name you wants, supposed its name is Public on your Computer.

2-Go to Start Button click on Programs, here you will click on Accessories and then pointing out the Windows Explorer.
3-Go to the drive where you make the folder Public and right-click on the folder named Public and then click on sharing option.
4-In folder’s properties option now click on Share this folder.

5-Use the default name for the share and if you wants to change you can but I named this share by-default
And then click Permissions tab.
6-At this tab Permissions, click on add option.
7-Now in the option select the Users, Computer or PC and Groups dialog box, Simply click the Authenticated users group and the click on OK.
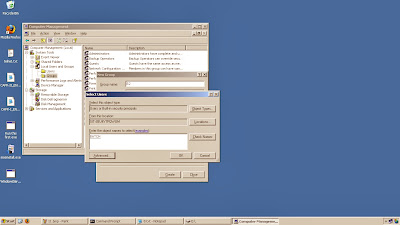
8-At the Permissions Tab you have to click the Authenticated Users Group Tab.
9-In permissions List, if you wants to Full control simply click the Full Control permission, click on allow and after located the appropriate permissions.
10-Last click on the everyone group and then click remove.

.jpg) |
| Shared Folder |
Note--For sharing a folder in Microsoft Windows you must be logged on a system via Administrator Account firstly.
1-Create a folder which name you wants, supposed its name is Public on your Computer.

2-Go to Start Button click on Programs, here you will click on Accessories and then pointing out the Windows Explorer.
3-Go to the drive where you make the folder Public and right-click on the folder named Public and then click on sharing option.
4-In folder’s properties option now click on Share this folder.

And then click Permissions tab.
6-At this tab Permissions, click on add option.
7-Now in the option select the Users, Computer or PC and Groups dialog box, Simply click the Authenticated users group and the click on OK.

8-At the Permissions Tab you have to click the Authenticated Users Group Tab.
9-In permissions List, if you wants to Full control simply click the Full Control permission, click on allow and after located the appropriate permissions.
10-Last click on the everyone group and then click remove.

1 comments:
-
StevenHWicker said...

-
I really liked your Information. Keep up the good work. Business Intelligence
-
4 January 2021 at 10:50

Popular Posts
-
.jpg) Windows Server 2003 Enhancements Microsoft windows servers every time having with mores of Enhanc...
Windows Server 2003 Enhancements Microsoft windows servers every time having with mores of Enhanc... -
.jpg) About the Server!!!! A mother of all computer or computer program which manages access to a centralized resource or service in a n...
About the Server!!!! A mother of all computer or computer program which manages access to a centralized resource or service in a n... -
.jpg) Configuration of Windows 2000 Server or Advanced 2000 Server: Thanks to updated management utilities and a slightly enhanced user interfa...
Configuration of Windows 2000 Server or Advanced 2000 Server: Thanks to updated management utilities and a slightly enhanced user interfa... -
 !!!Windows 2000 Family Editions!!! There are Four editions of Windows 2000 were released: Pr...

Post a Comment